The Ultimate Guide: How to Offer Bookings on Your Lnkk.it

Turn Your Time Into Income with Lnkk.it Bookings
The complete guide to setting up paid sessions, syncing your calendar, and automating your appointment flow—all from your link-in-bio.
Why Use Lnkk.it Bookings?
Lnkk.it Bookings is more than just a calendar tool. It's a complete business-in-a-box for coaches, consultants, and creators. Whether you're offering free 15-minute discovery calls or high-ticket coaching programs, Bookings automates the scheduling, payments, and reminders so you can focus on showing up.
Table of Contents
For Creators: The Setup Guide
For Visitors: The Booking Experience
Power Tips for Success
Frequently Asked Questions
1. ⚡ For Creators: The Setup Guide
Ready to start? Follow these 7 simple steps to go live.
Step 1: Enable Bookings Module
Head to your dashboard. In the left sidebar, click Bookings and toggle the main switch to "On". This activates the booking engine for your profile.
Action: Go to Dashboard → Bookings → Toggle "Enable"
Step 2: Sync Your Calendar (Crucial!)
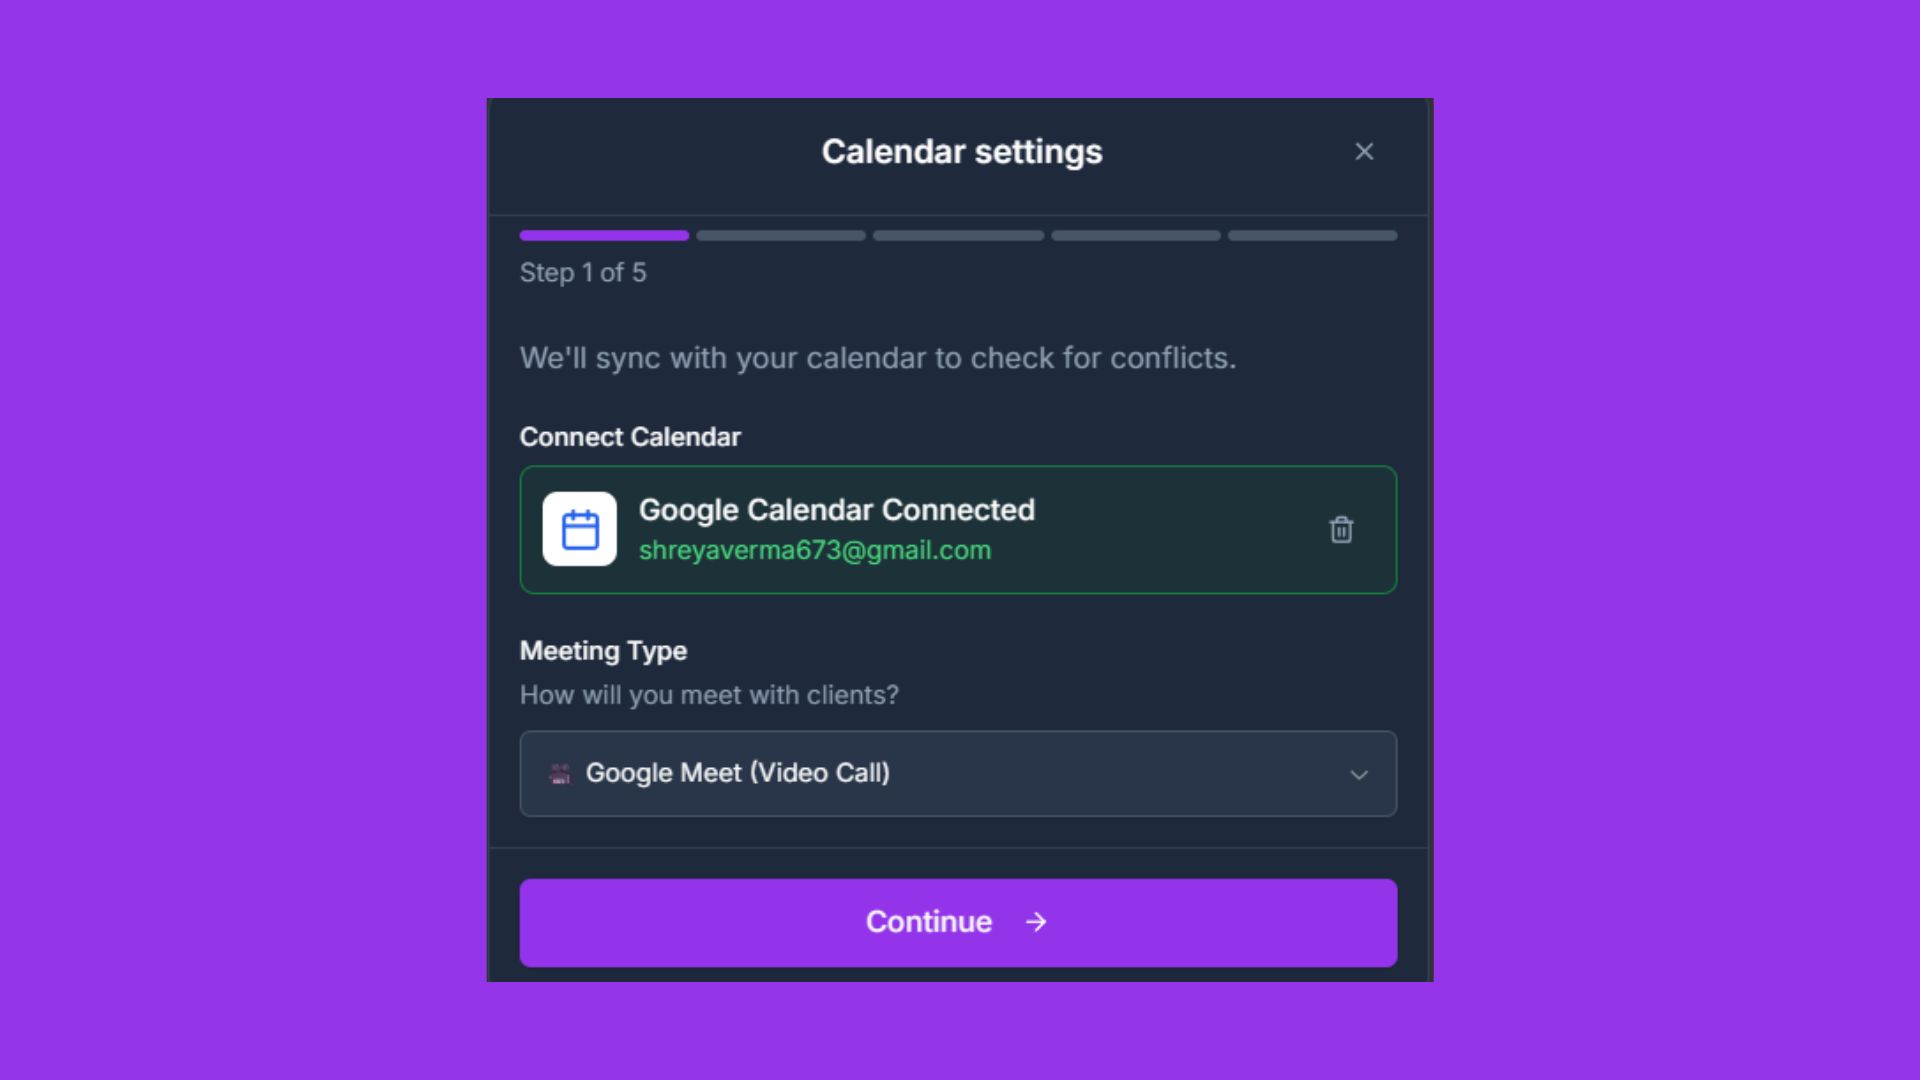
Connect your Google Calendar. This ensures you never get double-booked. We'll automatically block off times when you're busy with other events.
Why this matters: Without syncing, clients might book times when you're at the dentist or on vacation. Syncing keeps your availability real-time reliable.
Step 3: Define Operating Hours
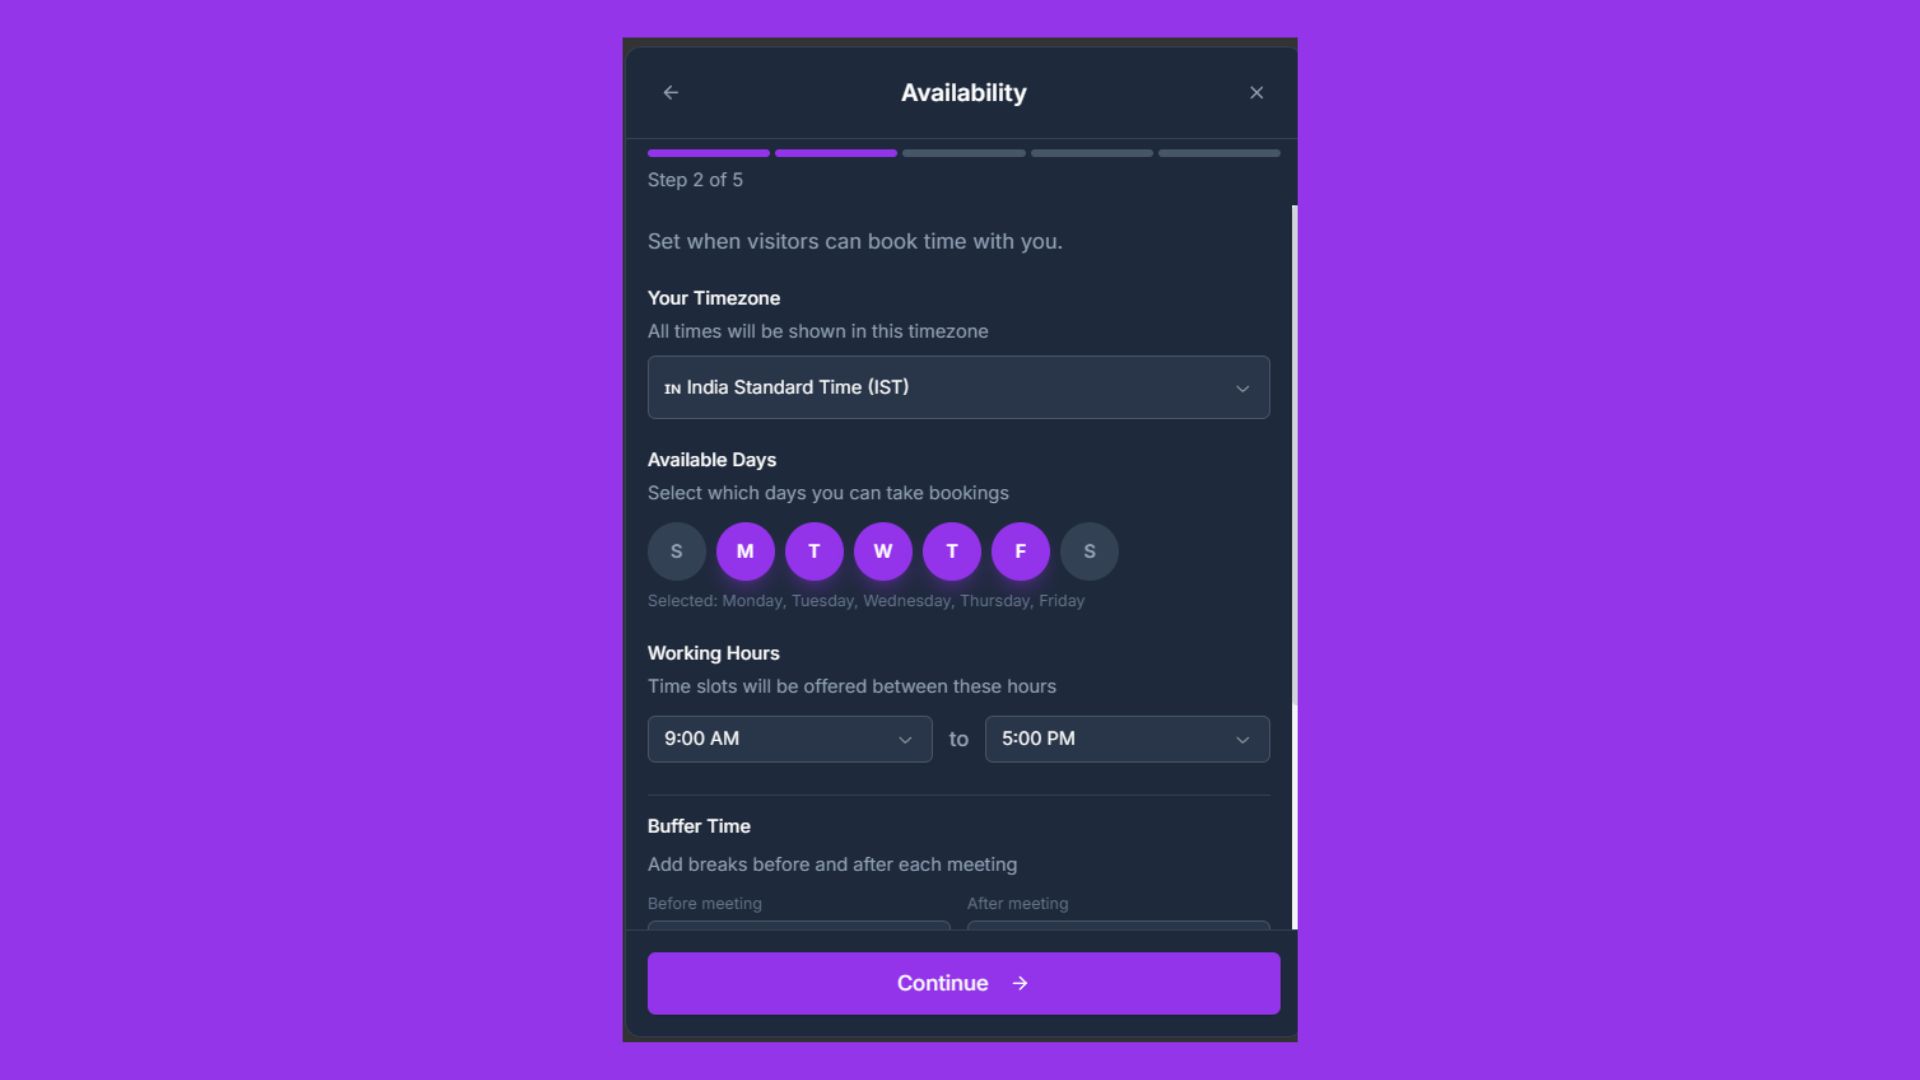
Set your weekly schedule. Drag to select hours you are generally available (e.g., Mon-Fri, 9 AM - 5 PM). You can exclude weekends entirely.
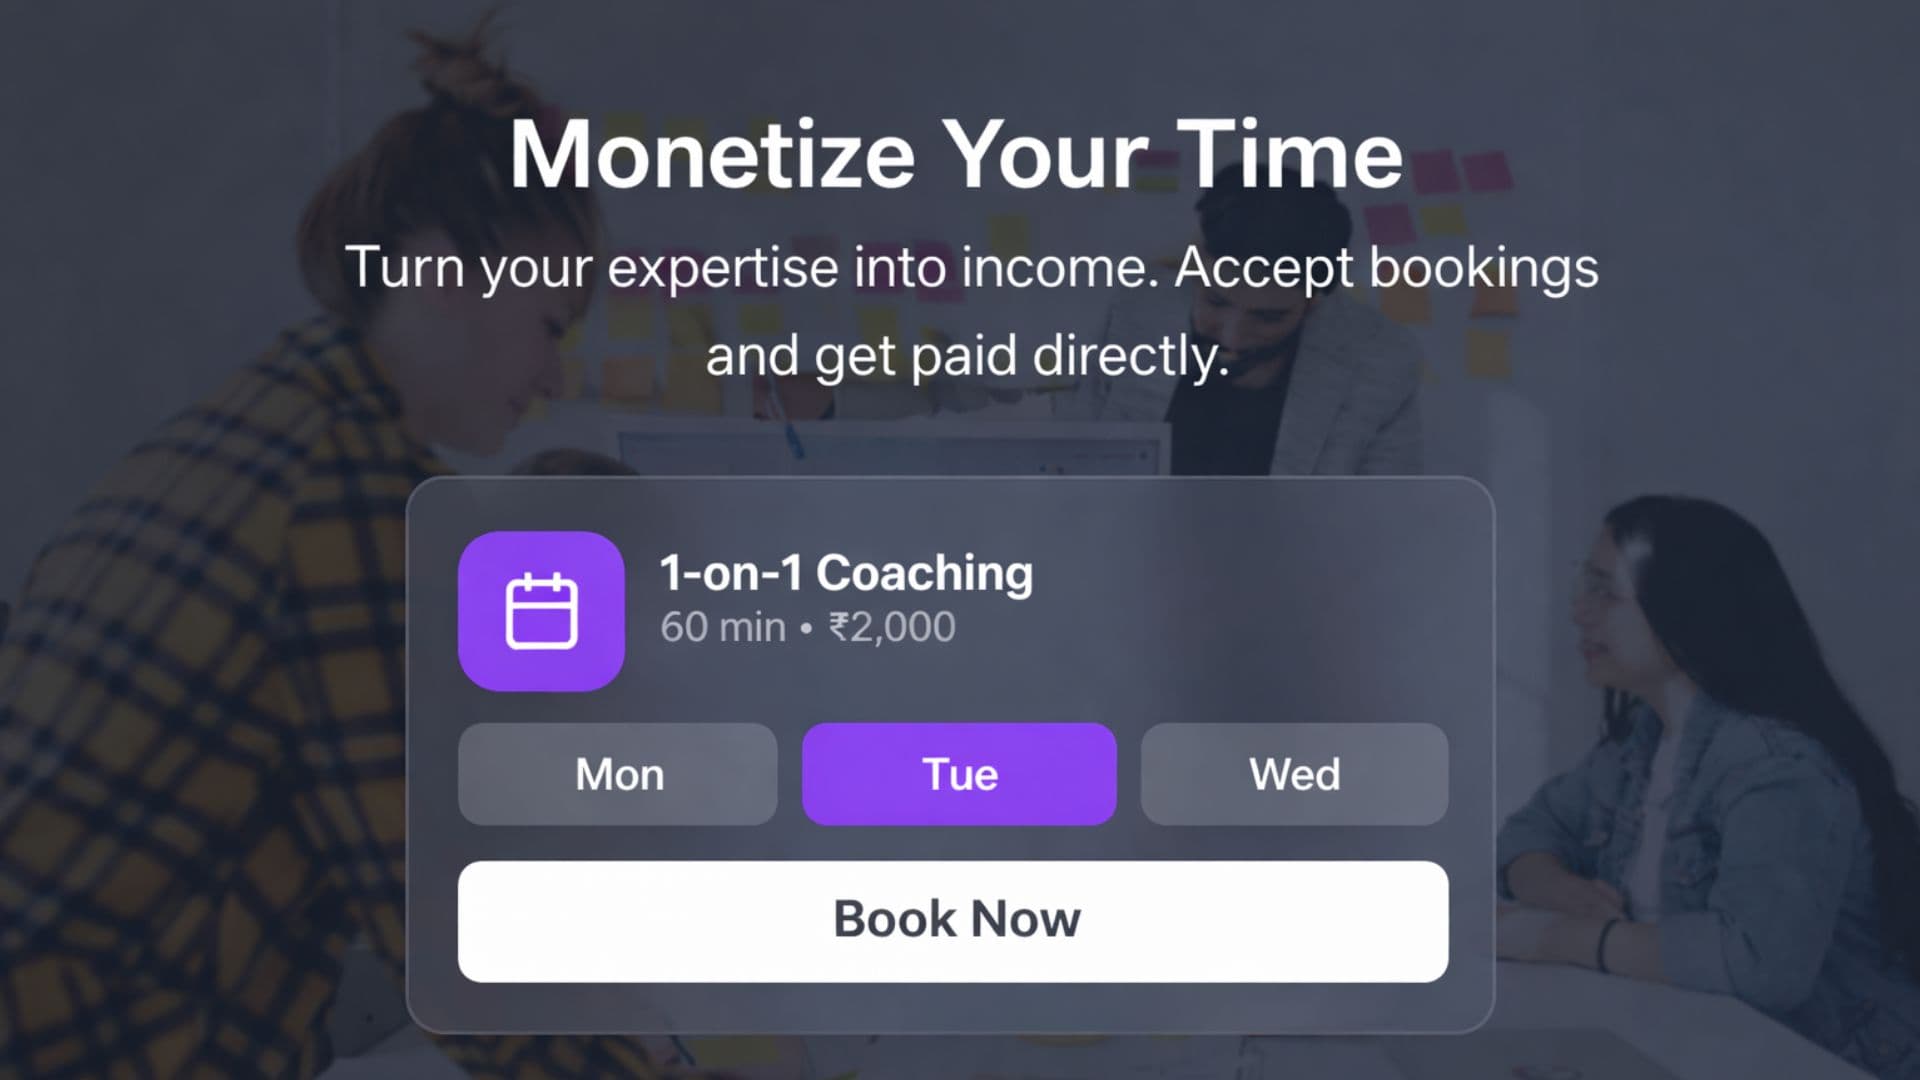
Step 4: Create Session Types
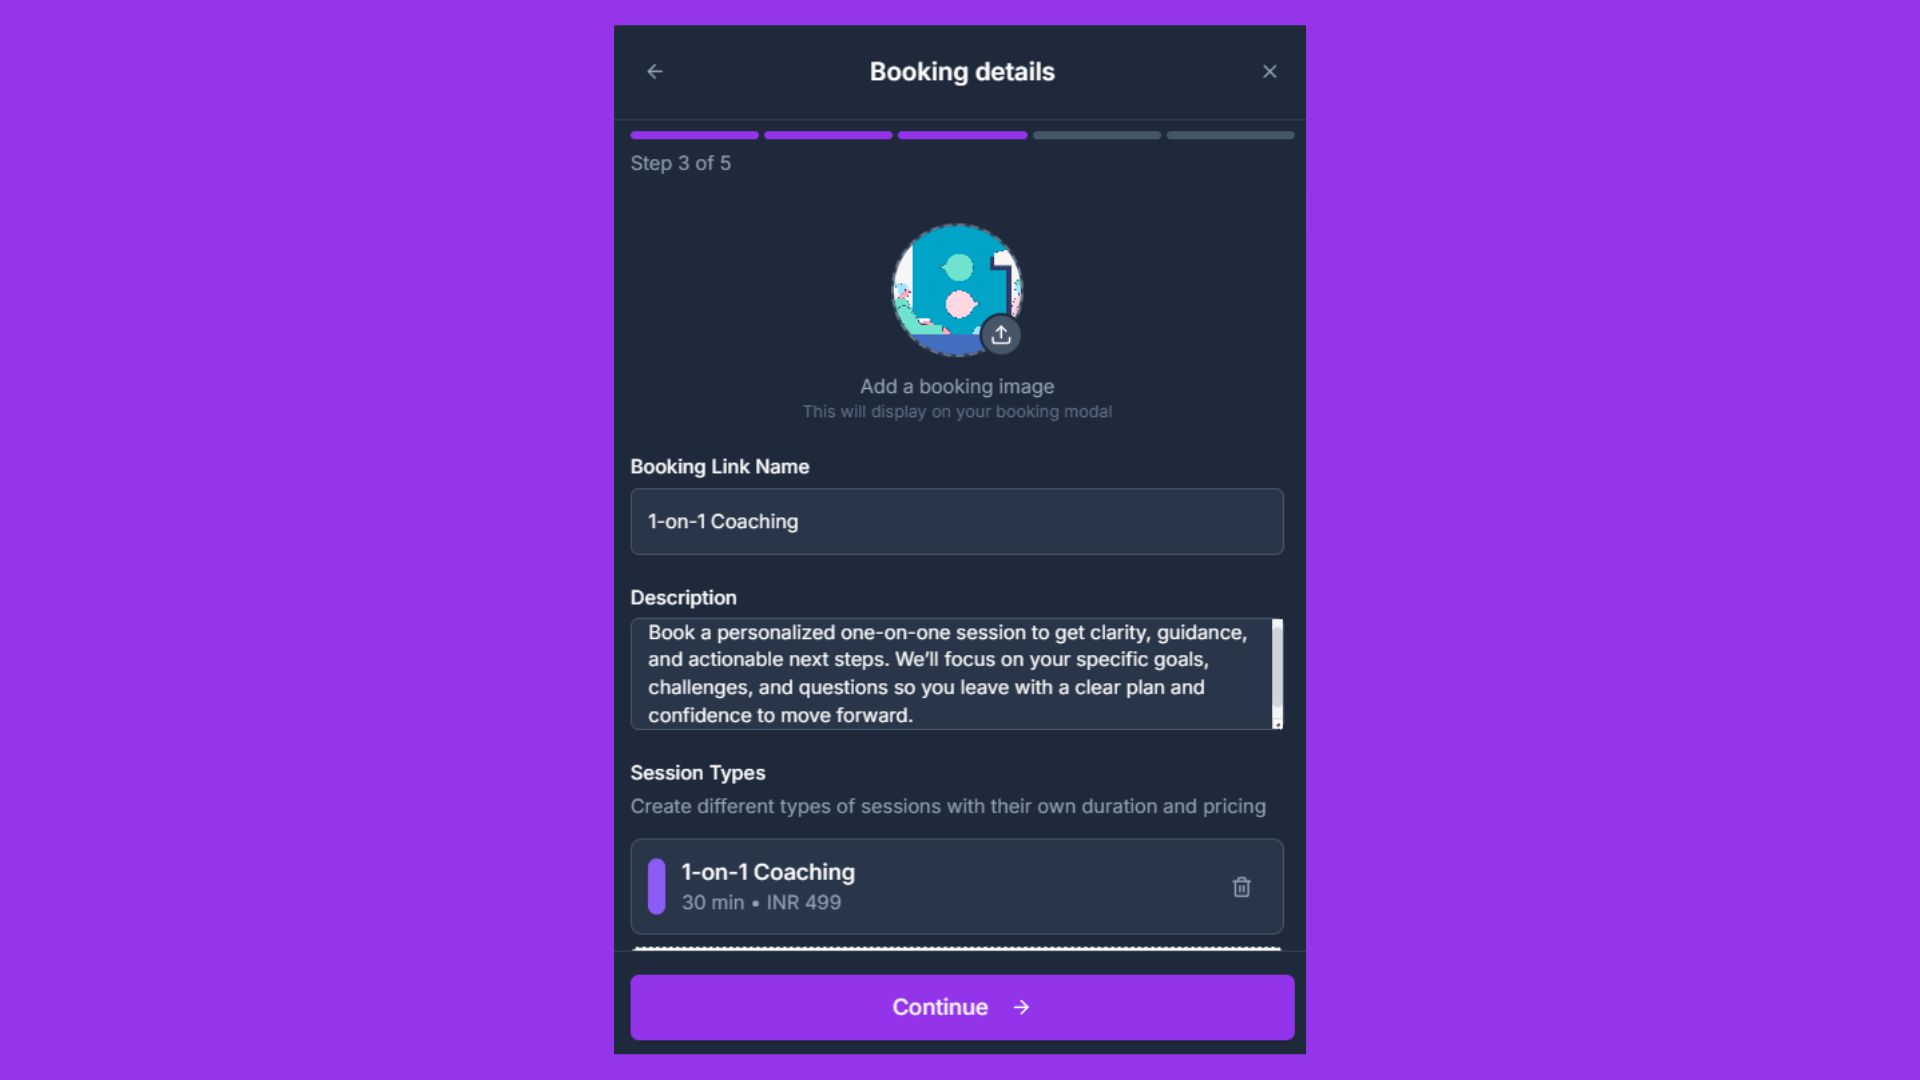
This is where you define what you sell. Create different cards for different services.
Examples:
☕ Coffee Chat: 15 min • Free (Great for networking)
🚀 Strategy Session: 60 min • $150 (Deep dive consulting)
🎨 Portfolio Review: 30 min • $50 (Quick feedback)
Step 5: Configure Custom Fields
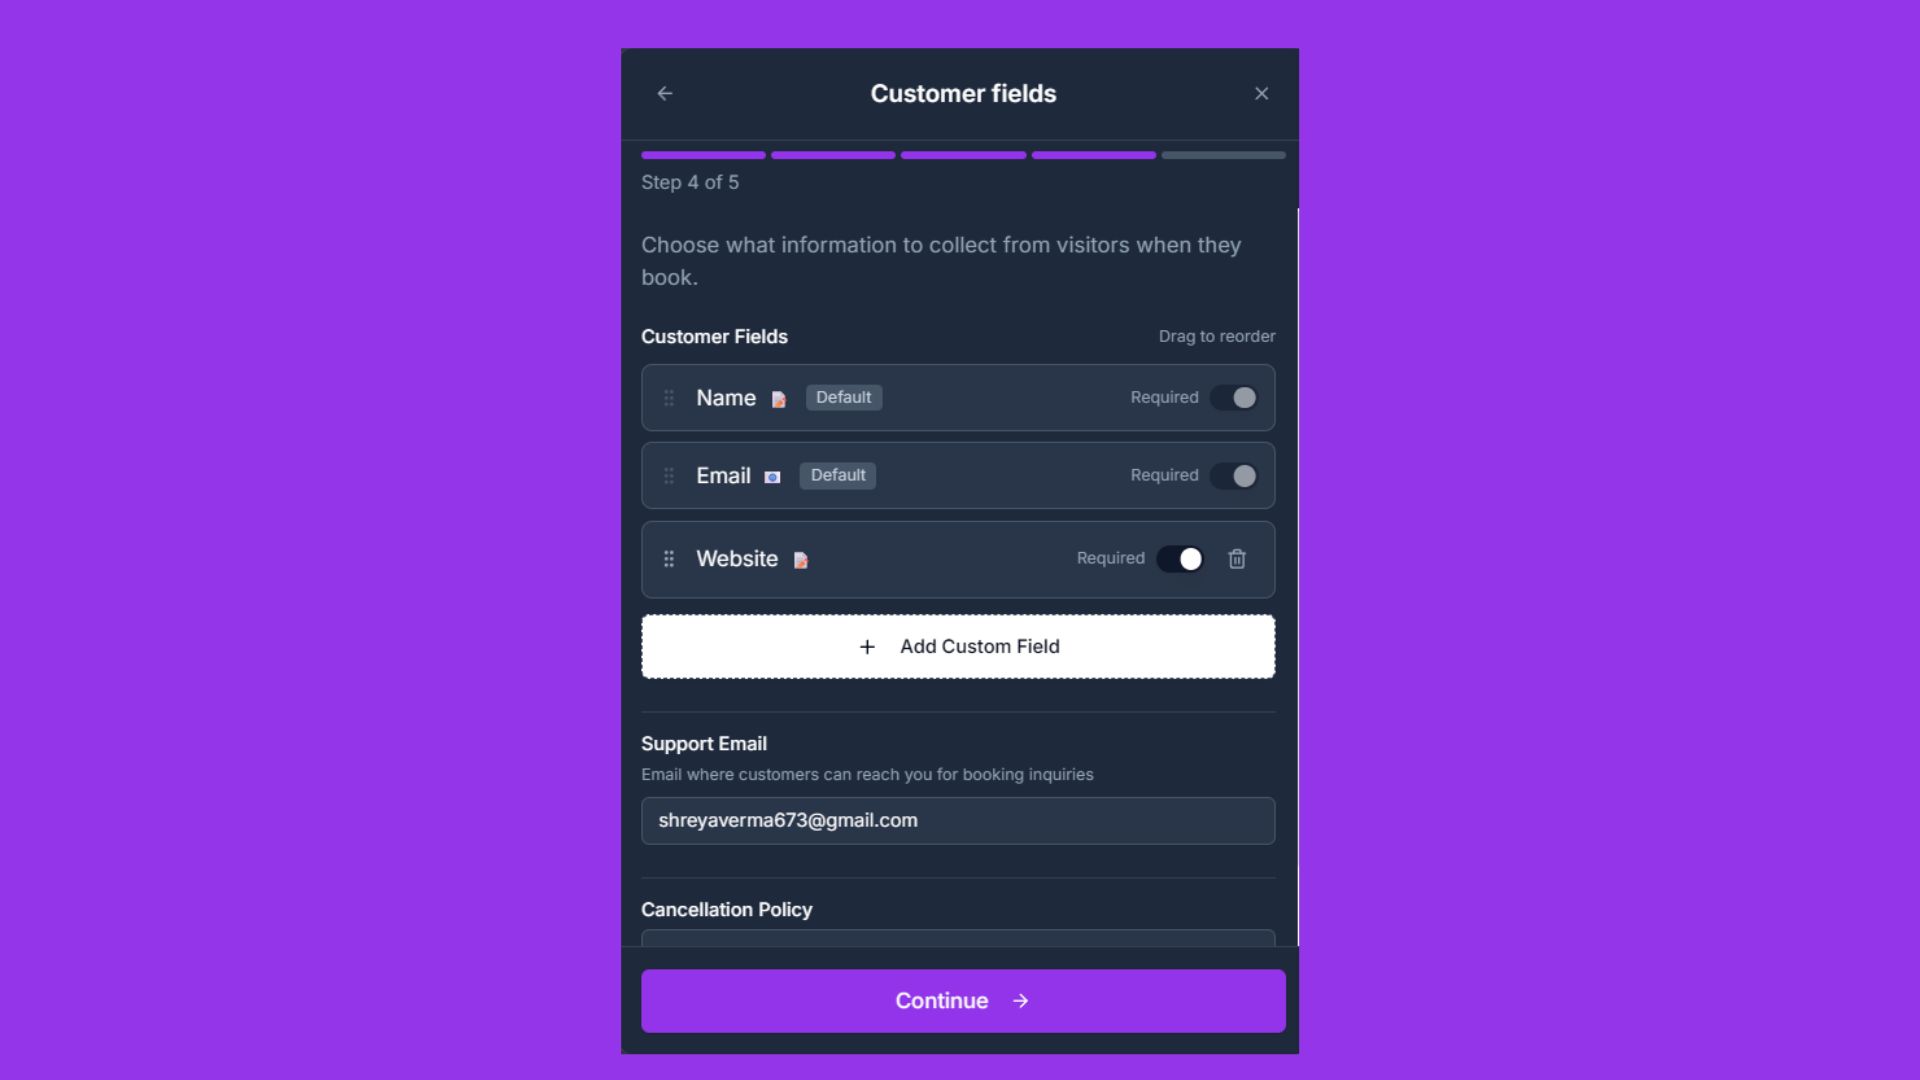
Don't just collect names. Add custom questions to your booking form to prepare for the call.
"What is your biggest challenge right now?"
"What is your website URL?"
Step 6: Link Your Payment Method
To accept paid bookings, add your bank account in Payout Settings. We process payments securely via Razorpay and deposit earnings directly to you (minus a small 8% platform fee).
Step 7: Set Cancellation Policy
Define your terms. How much notice do you need? This will be shown to visitors before they book to avoid last-minute dropouts.
2. 👀 For Visitors: The Booking Experience
We've designed the booking flow to be frictionless, reducing drop-off rates. Here is exactly what your client sees:
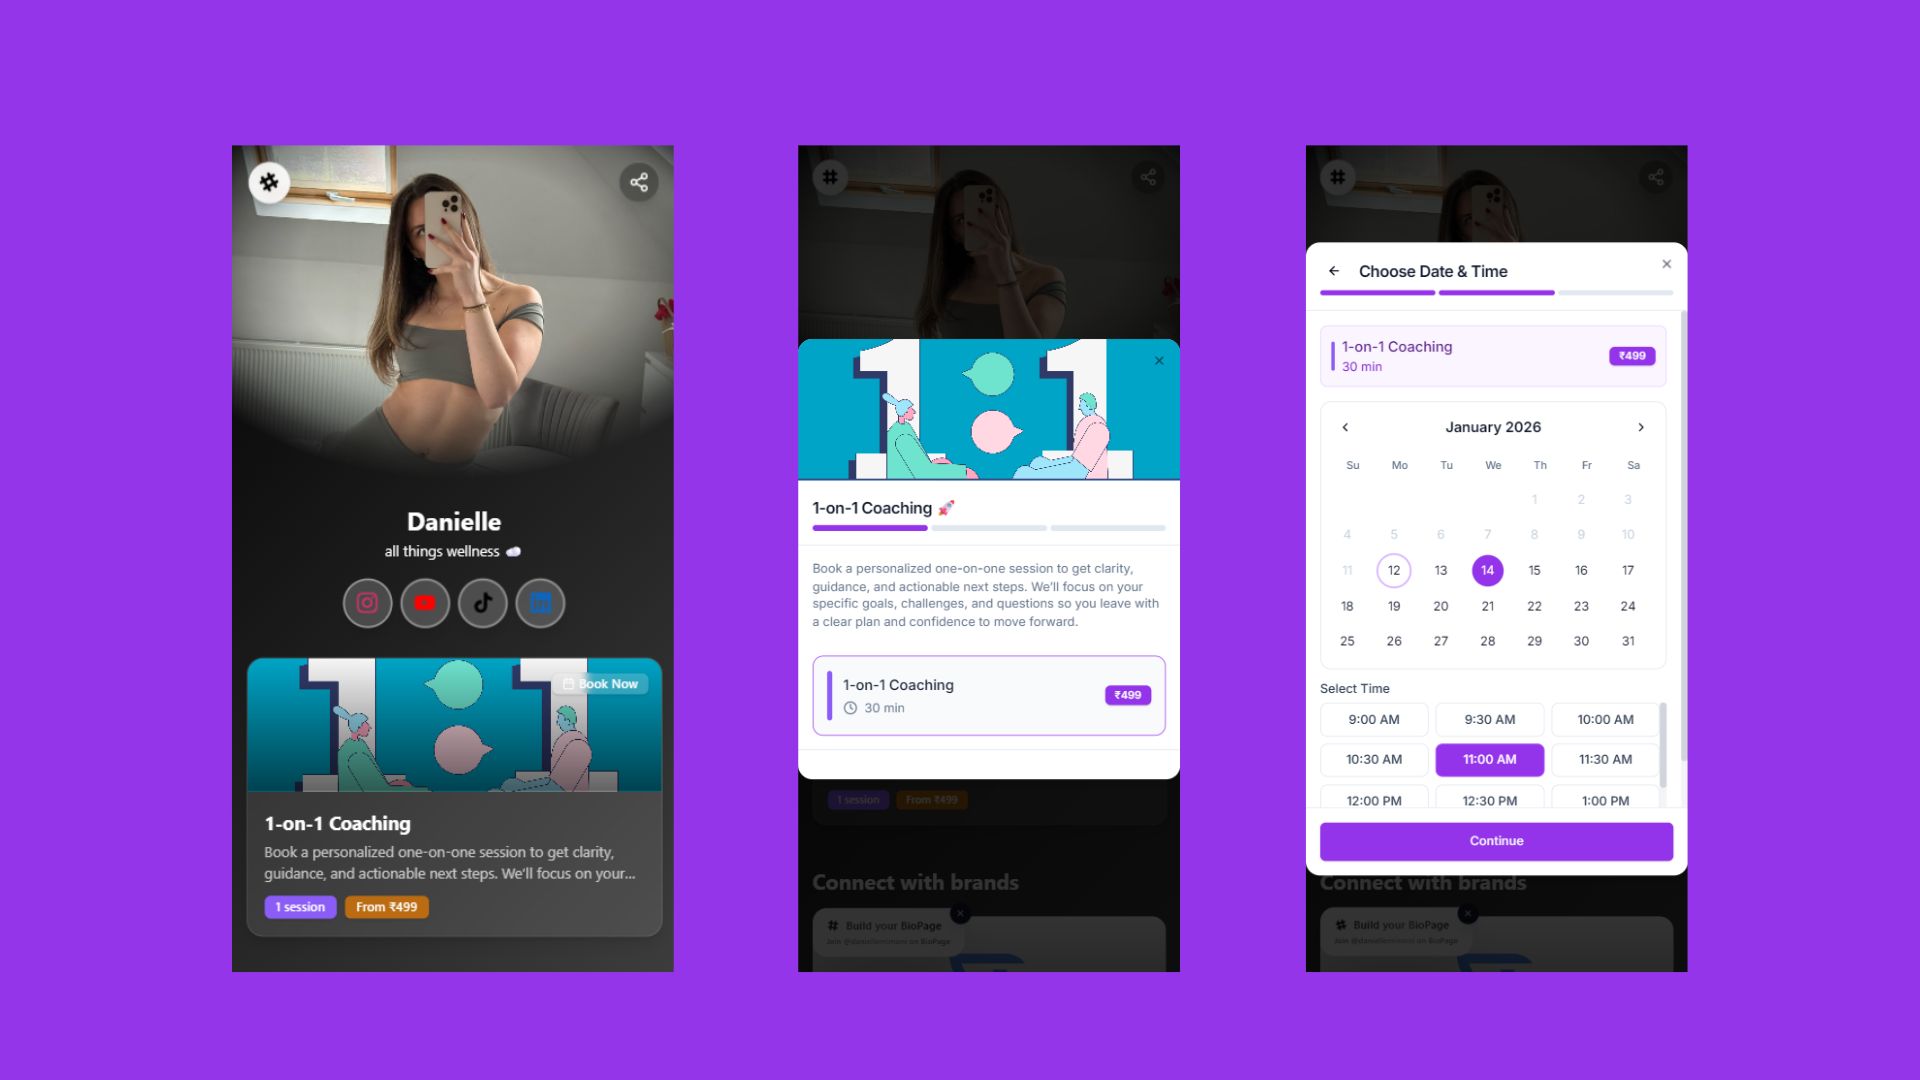
1. Mobile-Optimized Selection Visitors tap "Book" on your profile and see a clean list of your services. They can read descriptions and see prices upfront.
2. Smart Local Time Calendar They pick a date. Times are automatically converted to their local time zone. No more researching "what time is it in London?".
3. Simple Details Form They enter their Name, Email, and answer your custom questions.
4. Secure Payment For paid sessions, they pay instantly using Credit Card, UPI, or Debit Card.
5. Instant Confirmation Once booked, they instantly receive:
An email confirmation.
A calendar invite (.ics file).
A Google Meet link automatically generated inside the invite.
3. 🚀 Power Tips for Success

Add Buffers Don't book back-to-back! Add a 15-minute buffer in settings. This gives you time to get water, review notes, and prep for the next call without stress.
Use "Free" strategically Offer a free 15-minute "Discovery Call" to build trust. If they like you, they are much more likely to book a paid hour later.
Customize Your "Thank You" In your email settings, customize the message they get after booking. Add a link to a PDF resource or a "Preparation Guide" to add extra value.
4. ❓ Frequently Asked Questions
How do I get paid? Earnings accumulate in your dashboard. You can request a payout anytime to your linked bank account.
Does it support Zoom? Currently, we natively integrate with Google Meet (auto-generating links). For Zoom, you can simply paste your personal meeting room link in the booking description.
Can I limit how far in advance people book? Yes! In settings, you can set a "Notice Period" (e.g., must book 24h in advance) and "Future Limit" (e.g., can only book up to 30 days out).
How do I handle cancellations? Go to "Manage Bookings" in your dashboard. Click the "X" to cancel. The user will be notified immediately via email.
YOU MAY ALSO LIKE
How to Embed Typeform on Your Bio Link Page (Step-by-Step Guide)
Learn how to embed Typeform surveys, quizzes, and application forms directly on your Lnkk.it bio page. Collect leads, feedback, and applications without visitors ever leaving your profile.
How to Add Books to Your Lnkk.it: The Complete Step-by-Step Guide for Authors
Learn exactly how to add your books to Lnkk.it with this complete step-by-step guide. Display beautiful covers, link to multiple retailers, and give readers the buying experience they want.